

Most hardware store counters were never actually designed. They just accumulated. A register went in, then a card terminal got wedged next to it, then someone added a spinner rack for key blanks, then the sharpening vise migrated over from the back because a customer kept asking about it — and now there's maybe 14 inches of usable counter between the scanner and a wall of impulse buy hooks. Transactions back up. Chisels get nicked when they're set down next to the staple gun display. And nobody can quite explain why Saturday mornings feel like a traffic jam even when only three customers are in line.
This isn't a design problem in the pretty-showroom sense. It's an operational problem that leaks money in two specific places: slower transactions and physical damage to goods and repair items. Both are measurable. Both respond to small, cheap layout changes.
This post is narrow on purpose. We're going to look at the counter zone and the adjacent service bench — sharpening, small repairs, chain cutting, key cutting — and walk through footprints, fixture choices, two before/after sketches, and a two-week rework checklist you can run with a tape measure and a notebook.
The three jobs your counter is actually doing at once
Before any layout rule makes sense, you have to name what the counter is competing to do. In most single-location stores, the counter surface gets forced to handle three unrelated jobs:
-
Checkout — scanning, bagging, payment, the fast in-and-out customer.
-
Advice and lookups — the contractor who needs a part number, the homeowner holding a broken sprinkler head asking "do you have this?"
-
Service intake and handoff — dropping off a mower blade for sharpening, picking up a repaired item, paying a deposit.
The core mistake: all three jobs share the same two feet of counter. When a service handoff — slow, conversational, often involving a dirty or sharp item — lands in the middle of a checkout queue, everything stalls. The guy paying for a box of deck screws waits while someone inspects a sharpened axe. Meanwhile that axe is sitting on the same surface where the next customer will put their credit card.
The fix is almost never "get a bigger counter." It's zoning — physically separating the fast lane from the slow lane, even if they're only four feet apart.
Counter layout rules that actually move the needle
These are boring. That's why they work.
Stop losing sales due to inventory gaps.
Hardzly helps you manage stock levels, orders, and supplier interactions efficiently.
- Unified inventory and sales tracking
- Supplier and purchase order management
- Automated workflow and task scheduling
No credit card required
Rule 1: Protect the landing zone. Every checkout needs a clear flat surface to the right of the scanner (or left, depending on your flow) where customers set down items before scanning. Most jammed counters have zero landing zone — customers hold an armful of stuff while the cashier reaches for each piece. A clear 18–24 inches of landing space speeds a multi-item sale more than any register upgrade will.
Rule 2: Payment terminal faces the customer, fixed in place. A terminal on a cord that gets dragged around adds three to five seconds per transaction and causes cord clutter that knocks small items off the counter. Mount it. Angle it toward the customer at the far edge.
Rule 3: Sharp and dirty service items stay off the transaction surface entirely. This is the single biggest damage reducer. A separate drop/pickup shelf — even a 24-inch wide bump-out at the end of the counter — means blades, bits, and greasy parts never touch the surface where goods and cards go.
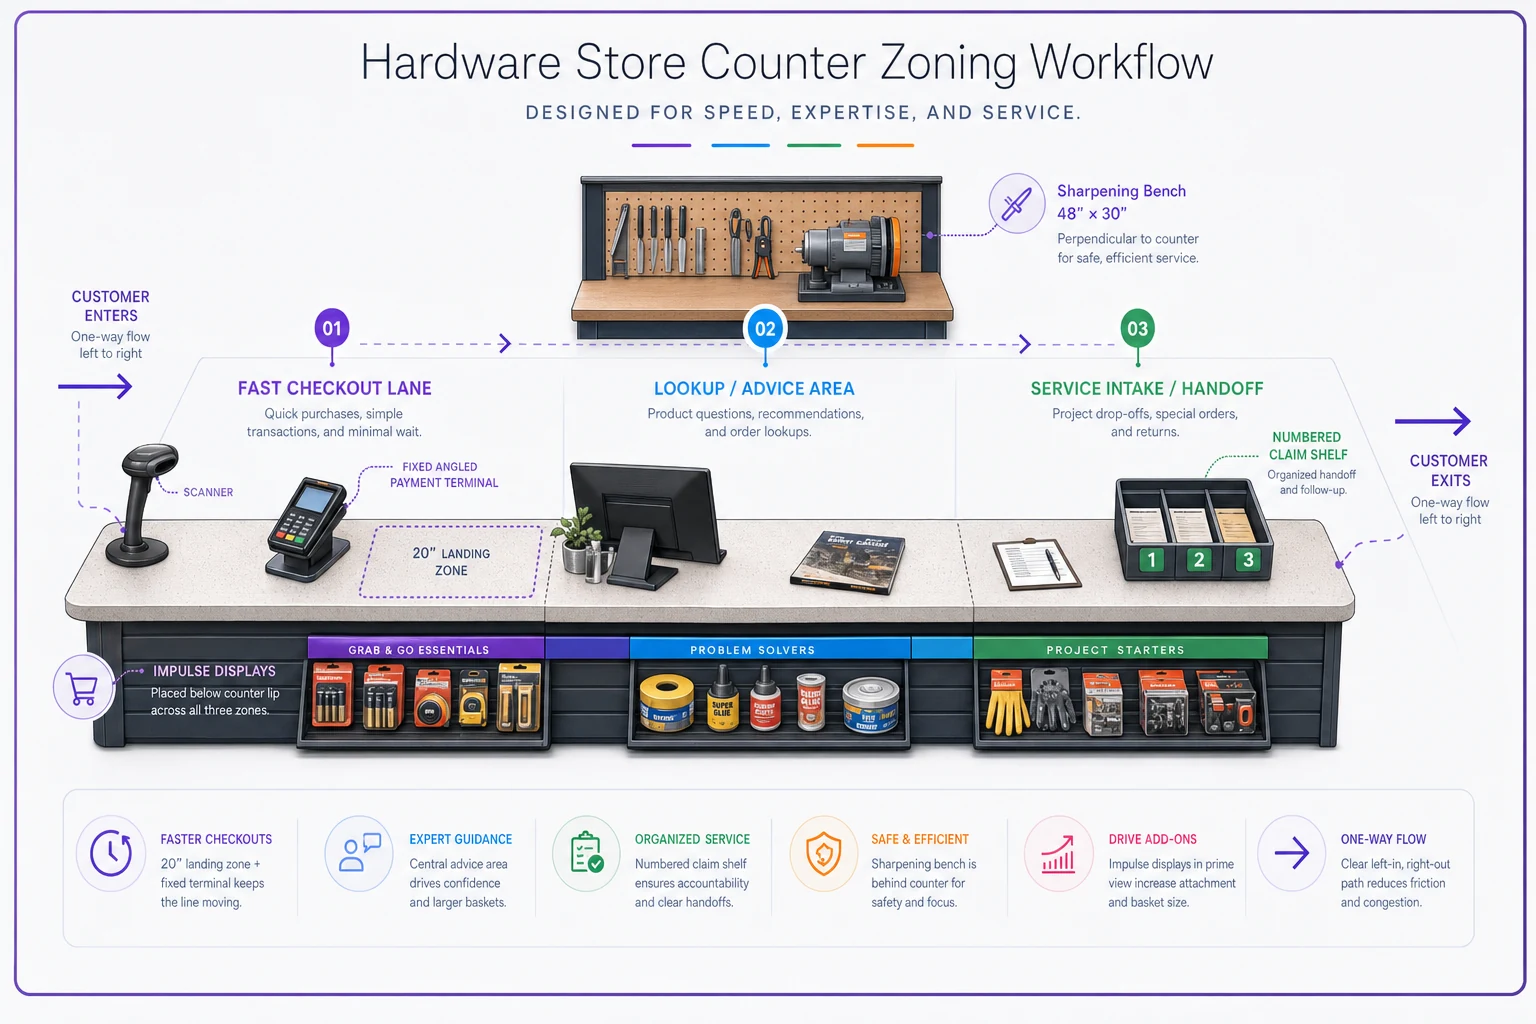
A simple workflow to separate fast and slow counter tasks:
Rule 4: Impulse displays go below the counter lip or behind the cashier — never between scanner and bagging. Spinner racks in the transaction path are throughput killers. They look like free revenue; they cost you queue speed on your busiest days.
Rule 5: One-way customer flow at the counter. Entry side, exit side. When pickups and checkouts come in from the same gap, you get the two-body collision at the register corner that everyone working retail has seen.
Recommended footprints for common service benches
Service work needs its own real estate. Cramming it onto the sales counter is where both damage and slowdowns originate. If you're running sharpening as an actual profit line — and if you're not, our breakdown on how to run tool sharpening as a profitable service is worth reading — the bench footprint matters more than most people think.
| Service | Minimum bench footprint | Key fixtures | Why this size |
|---|---|---|---|
| Bench grinder / sharpening | 48" W × 30" D | Grinder bolted to rear third, quench cup, task light, swarf tray | Need clearance for long blades (mower, machete) to swing past the wheel without hitting a wall |
| Key cutting | 36" W × 24" D | Duplicator fixed, blank board above, chip catch below | Keys are small; the challenge is managing blank inventory within arm's reach |
| Chain loop making / chainsaw | 48" W × 30" D | Chain breaker, spinner, vise, oil-safe mat | Chain handling needs elbow room and an oil-tolerant surface |
| Small repairs / assembly | 60" W × 30" D | Pegboard tool wall, vise, parts bins, outlet strip | Most variable work; benefits from the widest clear span you can give it |
| Combined intake/handoff | 24"–30" of shelf, separate from bench | Numbered claim tickets, drop bin, "ready" shelf | Keeps the dirty handoff out of the transaction zone |
One pattern worth noticing: depth matters more than width for safety. A 24-inch-deep bench forces the operator to work close to the front edge, which is where drops happen. Thirty inches gives a buffer zone. That extra six inches of depth is probably the cheapest damage reduction you'll ever buy.
Two before/after sketches (described)
You don't need CAD. Grab graph paper and sketch your counter at one square = six inches. Here are two realistic rework patterns.
Sketch A — The "shared surface" jam (before → after)
Before: An 8-foot straight counter. Register center, scanner center, card terminal on a cord that lives wherever it was last dropped. Key machine on the left end. Sharpening vise clamped to the right end. Spinner rack of carabiners sitting dead center. Customers queue straight at the register; pickups squeeze in from the right, past the sharpening vise.
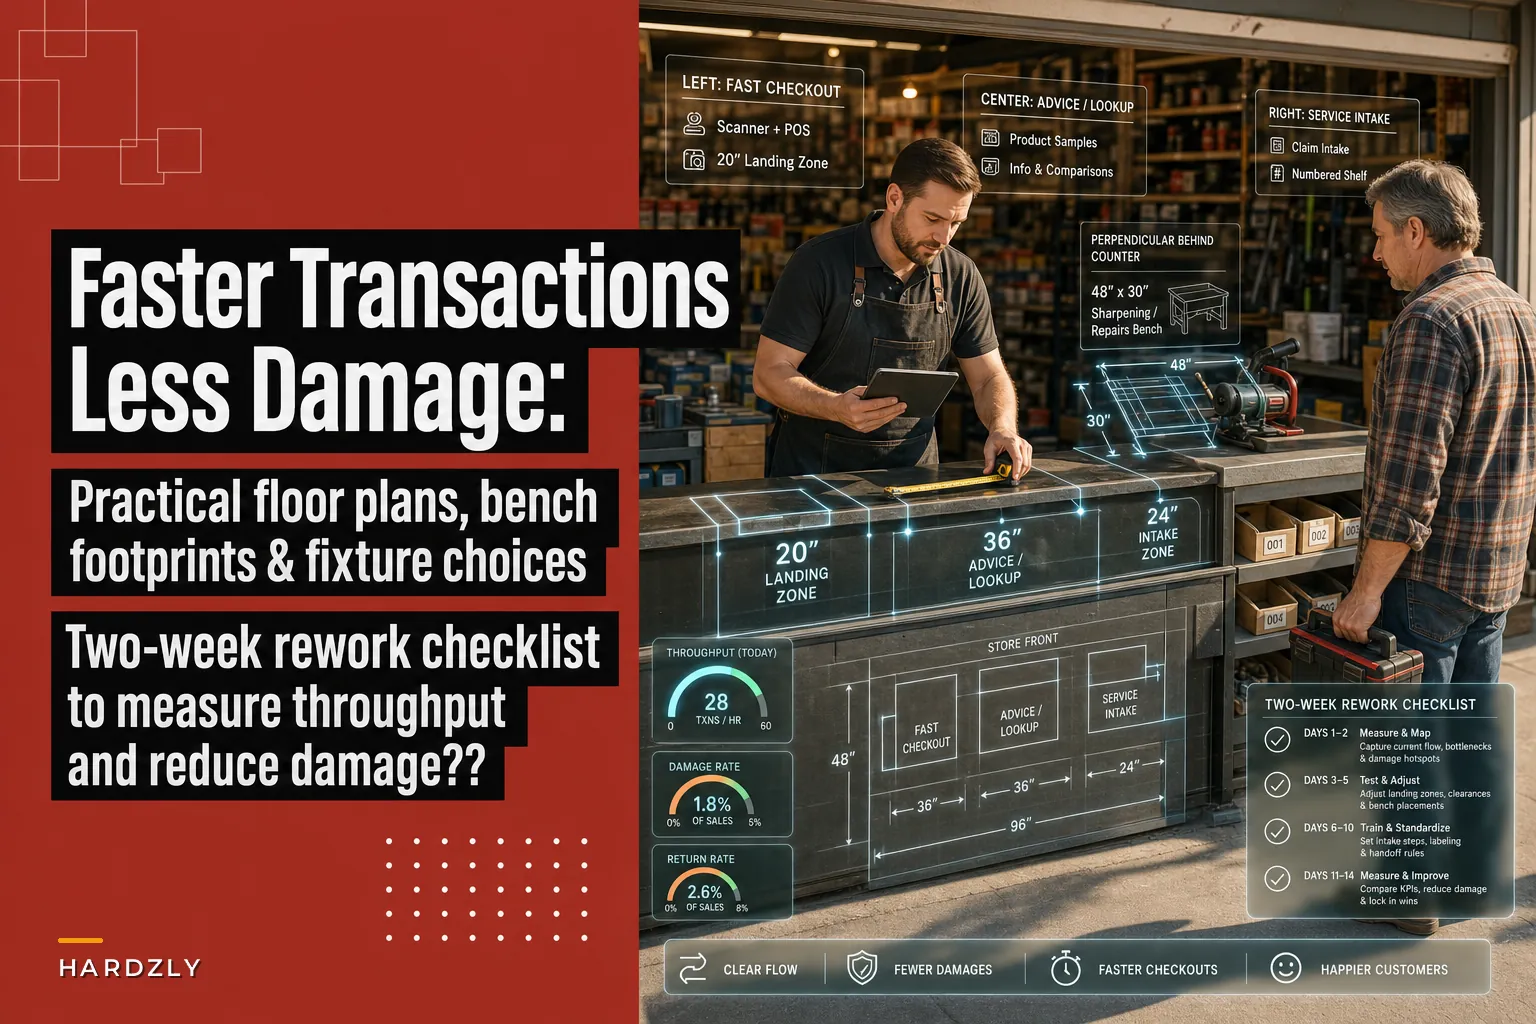
After: Same 8-foot counter, re-zoned. Left 3 feet becomes the fast checkout lane — scanner, fixed terminal angled out, 20-inch landing zone, bagging at the far left. Center 2 feet stays clear as working surface for lookups. Right 3 feet becomes service intake/handoff with a numbered claim shelf. The sharpening vise moves off the counter entirely to a dedicated 48-inch bench perpendicular to the wall behind the counter. The spinner rack drops to a below-lip position. Flow becomes left-in, right-out.
The move that does the most work here isn't adding anything — it's getting the sharpening vise off the sales surface. That one change alone removes most counter-area nicks and scratches on retail goods.
Sketch B — The L-counter with no landing zone (before → after)
Before: An L-shaped counter wrapping a corner. Register at the inside elbow — the worst possible spot, with no room on either side. Repair intake happens wherever there's space, often on top of a glass display case, which scratches the glass and creates a real breakage risk.
After: Move the register off the elbow and onto the longer leg, giving it a proper landing zone on the approach side. Dedicate the short leg to service intake with a wipeable solid-surface top — no glass. The elbow becomes the advice and lookup station where the computer lives. Nothing sharp ever touches the glass case again.
A real scenario with numbers
A single-location store with a solid sharpening and small-engine repair side business had the classic shared-surface counter. Two visible symptoms: Saturday checkout lines regularly hitting six or seven deep, and a steady trickle of damaged merchandise — scratched power tool cases, dinged packaging, a couple of dropped-and-cracked items per month — most of it originating in the counter chaos.
They did the Sketch A rework over a slow Tuesday afternoon. Cost was modest: a used workbench for the sharpening station (around $120), a mounting bracket for the card terminal, a numbered claim-ticket pad, and about two hours of moving things around. No construction.
Over the following month, average transaction time on multi-item sales dropped from somewhere around 95 seconds to roughly 70. Not dramatic per sale, but across a busy Saturday it visibly shortened the line. The clearer win was damage: counter-area merchandise incidents went from a predictable handful each month down to one or two, and the glass case stopped accumulating scratches because nothing got set on it anymore. Nobody added staff. They just stopped making the counter do three jobs on one surface.
Fixture choices that pay for themselves
You don't need to spend much. The fixtures that actually matter:
-
A fixed, angled payment terminal mount — kills cord clutter and shaves seconds per transaction.
-
A task light over every service bench — poor lighting is an underrated cause of sharpening errors and drops.
-
A wipeable, non-glass handoff surface — solid laminate or a rubber mat. Glass display cases make terrible intake surfaces.
-
A swarf/chip tray under the grinder — metal dust spreading onto the sales floor is both a slip risk and a product-contamination problem.
-
Numbered claim tickets — the cheapest tool for separating intake chaos from checkout. A two-part pad is enough.
-
Below-counter power strip — gets terminal, scanner, and label printer cords off the surface.
Bolt grinders to the rear third of the bench so long blades swing clear of the front edge and reduce chance of drops.
What to skip: fancy modular counter systems, glass-front impulse towers in the queue path, and anything that shrinks your clear landing zone to gain a few display facings.
The 2-week rework checklist (measure, change, re-measure)
The point of a two-week window is to get a before baseline, make the change, and see whether it actually moved anything. Don't skip the measurement half. "It feels faster" is how stores talk themselves into changes that didn't help.
Days 1–5: Baseline (change nothing yet)
-
[ ] Time 20 random multi-item transactions. Record start (first item down) to finish (receipt handed over). Note the median.
-
[ ] Count queue depth at your three busiest 30-minute windows. Log the peak.
-
[ ] Log every instance of merchandise damage, near-drop, or item set on an unsafe surface. Keep a tally sheet at the register.
-
[ ] Mark on a quick sketch where every service item (blades, parts) physically lands during the week.
-
[ ] Note the two slowest-feeling moments each day and what caused them.
Days 6–7: Rework
-
[ ] Draw your before/after on graph paper at 1 square = 6 inches.
-
[ ] Re-zone
fast checkout lane, clear landing zone, separate service intake/handoff.
-
[ ] Move sharp and dirty service work off the transaction surface to a dedicated bench (minimum 48"×30").
-
[ ] Mount the terminal, fix the scanner position, clear the queue path of impulse racks.
-
[ ] Set up numbered claim tickets and a "ready" pickup shelf.
Days 8–14: Re-measure (identical method)
-
[ ] Time another 20 multi-item transactions, same method, same time of day.
-
[ ] Re-count queue depth at the same three busy windows.
-
[ ] Keep the same damage/near-miss tally.
-
[ ] Ask two regular customers if checkout felt different — quick, not a formal survey.
-
[ ] Compare medians. If transaction time dropped and damage incidents fell, keep it. If not, your zoning is still off — usually the landing zone is too small or the handoff shelf is still too close to checkout.
The point is to have measurable before/after results so you can tell whether a small, cheap change actually moved the needle.
A simple throughput template you can keep running
You can track this on an index card taped by the register:
-
Transactions/hour at peak (count during one busy hour weekly)
-
Median multi-item transaction time (20 samples monthly)
-
Counter-area damage incidents (running monthly tally)
-
Service items mishandled (dropped, set on wrong surface)
The value isn't any single number — it's the trend after a layout change. If you're already tracking labor against your busy windows (worth doing; our piece on forecast-driven labor scheduling covers how to line staff up with actual demand), overlay your throughput numbers on your busiest shifts. A layout that holds up at your Saturday peak is the only one that matters.
When this makes sense — and when it doesn't
Do this if: your counter does double or triple duty, you run any service work through the front, or you've got queue backups and merchandise damage you can't fully explain. Payback is fast because the cost is mostly a slow afternoon and a used bench.
Hold off if: you're near a lease-end or planning a full remodel in the next few months — fold these zoning rules into that plan instead of doing it twice. Also skip the dedicated service bench if your sharpening and repair volume is genuinely light (a few items a week); a protected end-of-counter handoff shelf is enough.
Who shouldn't overthink this: a store with almost no service work and a counter that's already quiet. If lines aren't backing up and nothing's getting scratched, you don't have this problem.
The quiet point underneath all of this
Counter slowdowns and counter damage almost always trace back to the same root: one surface being asked to do jobs that move at different speeds and have different mess levels. Checkout wants to be fast and clean. Service intake is slow and dirty. When they share two feet of laminate, you lose on both ends. Separate them — even by a few feet — measure it over two weeks, and the register corner stops being the busiest, most stressful, most accident-prone square footage in your store.
Ready to elevate your hardware store management?
Join 500+ hardware stores using Hardzly to boost operational efficiency, reduce stockouts, and grow revenue.